
Intro to FeatureScript
/Ready Set Go
Build a fully functioning Onshape feature from scratch in under three minutes.
Adam explains the overall structure of a FeatureScript, invaluable workflow tips, and important notes about syntax and terminology. A must-see for any first-time-coder getting into FeatureScript.

Get Ready To Rock
It takes me exactly 23.3 seconds to write this entire feature from scratch. I timed it.
The result is a fully functional Onshape feature that looks and behaves exactly like any of the built-in features. That's because all of the default features--Extrude, Revolve, Loft, etc--are written in FeatureScript just like this.
Our feature has a feature parameters dialog that asks for a length value (expressed using the user's workspace units), and it creates a cube with a corresponding side-length.
Here's the finished code:
FeatureScript 347;
import(path : "onshape/std/geometry.fs", version : "347.0");

annotation { "Feature Type Name" : "Quick Cube" }
export const quickCube = defineFeature(function(context is Context, id is Id, definition is map)
    precondition
    {
        annotation { "Name" : "Cube Size" }
        isLength(definition.cubeSize, LENGTH_BOUNDS);
    }
    {
        cube(context, id, {
                "sideLength" : definition.cubeSize
        });
    });
Break it Down
Just as Parts in Onshape are defined in Part Studios, Features are defined in Feature Studios.
A Feature Studio is presented as a clean Integrated Development Environment (IDE) for the user. We will do all of our coding here.
I highly recommend opening up two separate browser windows while you work, and placing them side-by-side. The one on the left will be your code, and the one on your right will be a Part Studio where you can see your changes update as you work. The immediacy of the feedback is invaluable, especially while you're learning.
Many common code snippets are available for quick access in the toolbar at the top of the editor. We'll use these to create our first two features.
Step-By-Step
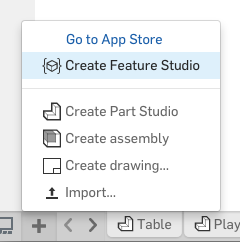

- Click New Feature
- Type "Quick Cube" to define the tool name that the user sees, then hit Tab to advance to the next highlighted area of the snippet.
- Type "quickCube" to define Onshape's internal name for the feature, then hit Tab to advance.
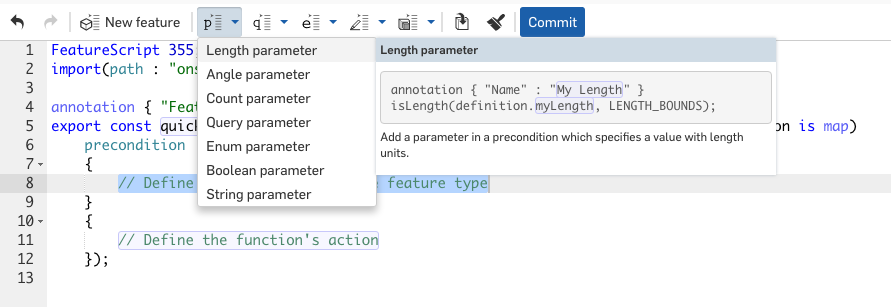
Note: Since this is how Onshape will refer to this feature internally, it's important that once you've used a given feature, you must never change this name. No spaces or special characters are allowed in these internal names: letters, numbers, and underscores only, please. - Click Parameters > Length
- Type "Cube Size" to define the parameter name that the user will see. Tab to advance.
- Type "cubeSize" to define the internal variable name for the parameter. Tab twice to advance to feature definition.
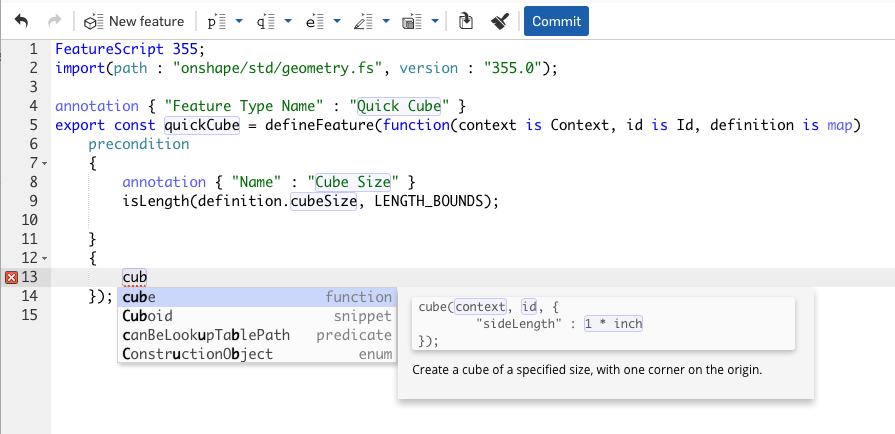
Note: No spaces or special characters allowed. - Type "cub". Auto-complete offers options. Select "cube" by either clicking or hitting enter. Hit Tab twice to select the sideLength parameter value.
- Type "definition.cubeSize" to reference our input parameter.
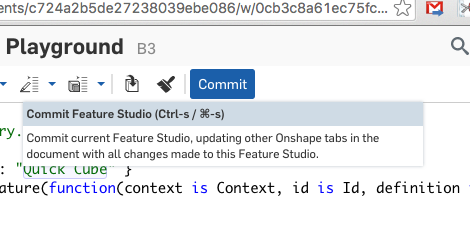
- Click Commit
- Get your cube on.
// Here's what we've done.

// The header tells Onshape what version of FeatureScript
// to use when interpreting our code. This is crucial.
// It means that no matter what changes Onshape makes to
// FeatureScript in the future, our code will still work.

FeatureScript 347;
import(path : "onshape/std/geometry.fs", version : "347.0");

// The annotation statement preceding a variable definition
// is typically for defining user interface related info.
// In this case, "Feature Type Name" is telling Onshape what
// to call the feature in the toolbar. This can be pretty much
// anything. Spaces and most special characters are allowed.

annotation { "Feature Type Name" : "Quick Cube" }

// Now we define the actual feature itself, which is
// ultimately just a function that our Part Studio can call
// whenever it wants to implement a Quick Cube.

// The reason the feature is structured this way is beyond
// our scope in this tutorial. Suffice it to say that "quickCube"
// is a constant, and that's how Onshape will call our
// feature.

// Once you've defined your constant as "quickCube" (or whatever),
// don't change it. If you do, Bad Things will happen.

export const quickCube = defineFeature(function(context is Context, id is Id, definition is map)

    // The 'precondition' tells Onshape what to put in the
    // feature dialog. In this simple example we'll be asking
    // the user for a simple Length value.

    precondition
    {
        // Annoations are for UI, remember?
        // This is the parameter name that appears in the dialog.
        annotation { "Name" : "Cube Size" }

        // Here we ask the user for a Length value, and store
        // it in "definition.cubeSize". The syntax is a bit odd
        // to the uninitiated. Just ignore it for now.

        isLength(definition.cubeSize, LENGTH_BOUNDS);
    }

    // This is where the magic happens. The second block in our
    // FeatureScript defines what happens when the feature rebuilds.
    // This is where we actually create geometry.

    {

        // The cube feature is really just for demos. You can only
        // change its size, and nothing else. You can't control its position
        // or orientation. Nothing. But it's a useful example.

        // Ignore "context" and "id" for now, and just focus on the
        // feature definition: it takes one parameter called "sideLength",
        // and we're piping our "definition.cubeSize" parameter into it.

        cube(context, id, {
                "sideLength" : definition.cubeSize
        });
    });
That's (not) All, Folks
We're not done here. Next time we'll build a real tool you can actually use in your daily work. Stay tuned.