
FeatureScript 101: write your first Onshape features
What FeatureScript is
When you click Extrude, Fillet, or Shell in Onshape, you are running a feature. FeatureScript is the programming language those features are written in. Onshape's own standard features are built with it, and the same language is open to you. That means you can write a custom feature that appears in your toolbar, takes inputs in a dialog, shows up in the feature list, and updates when the model changes, exactly like a built-in tool.
Why bother? Because most design work repeats. If you model the same bracket, the same boss, or the same fastener over and over, a custom feature turns that sequence of steps into one click with a few parameters. It also turns your company's or your studio's standards into something everyone uses the same way.
You do not need to be a software engineer to start. FeatureScript reads a lot like a careful description of what you would do by hand: make a sketch on this plane, draw a hexagon this big, extrude it this far. If you can model the part manually in Onshape, you can learn to describe it in FeatureScript. This course starts with the smallest possible working feature and builds up to one you might really keep in your toolbar.
How you will work
Feature Studio next to a Part Studio
FeatureScript lives in a tab called a Feature Studio. Create one from the plus menu at the bottom of any Onshape document. Onshape opens a code editor with a basic template already filled in.
The most comfortable way to work is to have the Feature Studio open on one side of the screen and a Part Studio on the other. You edit code in one, commit it, and then test the feature in the other. Onshape lets you split the window so both tabs are visible at once.
Snippets
The Feature Studio has a snippets menu that inserts common pieces of code, such as a new feature definition or a parameter. Use snippets when you start. They save typing, and they show you the exact syntax Onshape expects.
Pin a version
The first line of every Feature Studio declares which version of FeatureScript it uses, and the import line below it names the version of Onshape's standard library. Onshape fills in the current version for you when you create the tab. Older examples online use much older version numbers, so do not copy a version line from an old tutorial.
Pinning a version is a feature, not a nuisance. It means a custom feature keeps behaving the same way even as Onshape updates its library. When you want newer library functions, update the version deliberately and retest your feature. In the code samples below, the version lines are shown as VERSION; keep whatever number Onshape inserted in your own tab.
Lesson 1: Intro, Quick Cube
The first feature is deliberately tiny: a cube whose size the user chooses. It teaches the shape of every feature you will write.
Create a feature, and name it carefully
Use the snippets menu to insert a new feature. A feature has two names:
- The display name in the annotation, which is what users see in the toolbar and the feature list. You can change it any time.
- The internal name, the exported constant in the code. Once the feature has been used in a Part Studio, existing parts refer to it by this name. Rename it later and those parts can break. Choose it once and leave it alone.
A length parameter the user sees
Parameters are declared in the precondition block. Each one gets an annotation that controls how it appears in the dialog, and a test that says what kind of value it is. For a length, use isLength with a set of bounds, which gives the user a length box with units.
Call a cube with the size
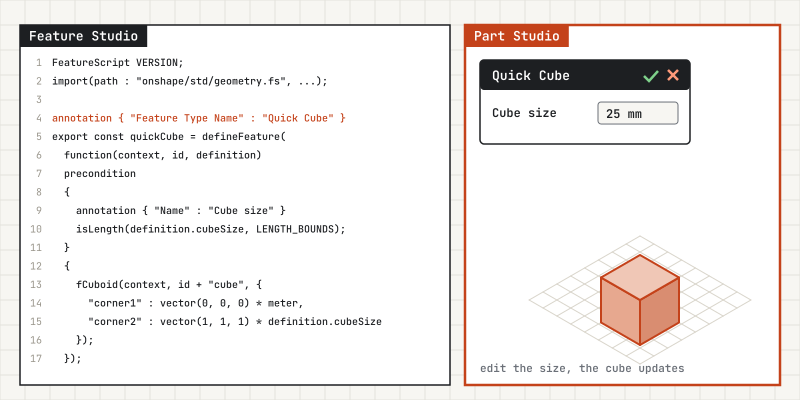
The body of the feature does the work. Onshape's standard library includes fCuboid, which makes a box between two corners. Pass it the origin as one corner and a point at the cube size in all three directions as the other.
FeatureScript VERSION;
import(path : "onshape/std/geometry.fs", version : "VERSION.0");

annotation { "Feature Type Name" : "Quick Cube" }
export const quickCube = defineFeature(function(context is Context, id is Id, definition is map)
    precondition
    {
        annotation { "Name" : "Cube size" }
        isLength(definition.cubeSize, LENGTH_BOUNDS);
    }
    {
        // One corner at the origin, the other at the chosen size on every axis
        fCuboid(context, id + "cube", {
                "corner1" : vector(0, 0, 0) * meter,
                "corner2" : vector(1, 1, 1) * definition.cubeSize
        });
    });
Commit and test in a Part Studio
Click Commit in the Feature Studio. If there are errors, the editor marks the line and describes the problem. Switch to the Part Studio, open the custom features menu in the toolbar, and add Quick Cube. Type a size, accept, and you should see a cube. Edit the feature, change the size, and watch the part update. That round trip of edit, commit, and test is how all FeatureScript development works.
Lesson 2: Hex nut, basics
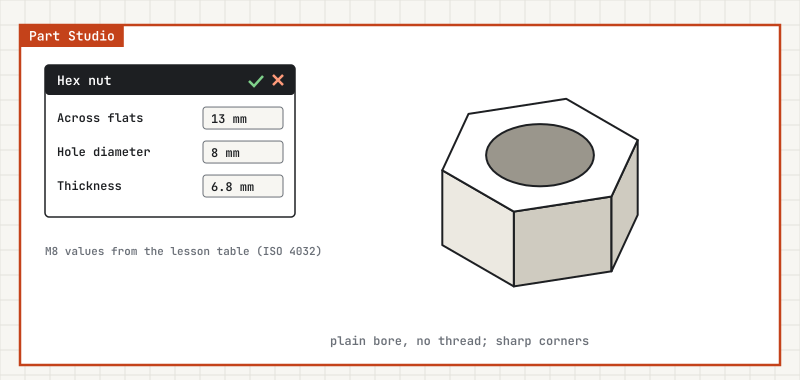
A cube proves the workflow. A hex nut is something you might really use. The steps are the same ones you would take by hand: sketch a hexagon and a hole, then extrude.
- Make a sketch. Create a sketch on the top plane with
newSketchOnPlane. - Draw the hexagon. Use
skRegularPolygonwith six sides. The distance across the flats of a nut is the size people measure with a wrench, so make that the user's input and work out the corner position from it. The corner of a regular hexagon sits at the across-flats size divided by the square root of 3 from the center. - Draw the hole. Add a circle at the center with
skCircle. - Solve the sketch with
skSolve. - Extrude the region between the hexagon and the circle with
opExtrude, using the thickness as the depth.
precondition
{
    annotation { "Name" : "Across flats" }
    isLength(definition.acrossFlats, LENGTH_BOUNDS);
    annotation { "Name" : "Hole diameter" }
    isLength(definition.hole, LENGTH_BOUNDS);
    annotation { "Name" : "Thickness" }
    isLength(definition.thickness, LENGTH_BOUNDS);
}
{
    var sketch = newSketchOnPlane(context, id + "sketch", {
            "sketchPlane" : plane(WORLD_ORIGIN, Z_DIRECTION)
    });
    skRegularPolygon(sketch, "hex", {
            "center" : vector(0, 0) * meter,
            "firstVertex" : vector(definition.acrossFlats / sqrt(3), 0 * meter),
            "sides" : 6
    });
    skCircle(sketch, "bore", {
            "center" : vector(0, 0) * meter,
            "radius" : definition.hole / 2
    });
    skSolve(sketch);

    // Keep the ring between the hexagon and the hole
    opExtrude(context, id + "extrude", {
            "entities" : qSketchRegion(id + "sketch", true),
            "direction" : Z_DIRECTION,
            "endBound" : BoundingType.BLIND,
            "endDepth" : definition.thickness
    });
}
This is the body of the feature only; wrap it in the same feature definition structure as Quick Cube, with a new display name and internal name. The model is simplified: the hole is plain, with no thread, and the corners are sharp. Adding a chamfer or a cosmetic thread is a good exercise once it works. Standard library function names and options occasionally change, so if something does not compile, check the current FeatureScript documentation for the function in question.
Lesson 3: A dropdown of standard metric sizes
The basic nut asks for three numbers. That works, but it invites mistakes: someone types 7.5 across the flats for an M4 nut, and the part no longer matches the hardware on the shelf. Real nuts come in standard sizes, so the feature should offer a list of them.
Define an enum
An enum is a fixed list of named choices. In FeatureScript, an exported enum used as a parameter appears in the dialog as a dropdown.
export enum NutSize
{
    annotation { "Name" : "M3" }
    M3,
    annotation { "Name" : "M4" }
    M4,
    annotation { "Name" : "M5" }
    M5,
    annotation { "Name" : "M6" }
    M6,
    annotation { "Name" : "M8" }
    M8
}
Map each size to its dimensions
Next, a map from each size to its numbers. The values below are nominal thread diameter, width across flats, and maximum nut height for regular hex nuts, in millimeters, as listed in ISO 4032. Check them against the standard or your supplier's catalog before you rely on them for production.
const NUT_TABLE = {
        NutSize.M3 : { "d" : 3, "s" : 5.5, "m" : 2.4 },
        NutSize.M4 : { "d" : 4, "s" : 7, "m" : 3.2 },
        NutSize.M5 : { "d" : 5, "s" : 8, "m" : 4.7 },
        NutSize.M6 : { "d" : 6, "s" : 10, "m" : 5.2 },
        NutSize.M8 : { "d" : 8, "s" : 13, "m" : 6.8 }
};
Use it in the feature
Replace the three length parameters with one dropdown: annotation { "Name" : "Size" } definition.size is NutSize;. In the body, look up the row with const row = NUT_TABLE[definition.size]; and use row.s * millimeter, row.d * millimeter, and row.m * millimeter where you used the user's lengths before.
Why a dropdown is better for hardware
A dropdown makes the right answer the easy answer. Nobody has to look up a table or remember a number, and every nut in every model matches a part you can buy. It also makes the design intent obvious: anyone reading the feature list sees M5, not three unexplained numbers.
Good habits
- Never rename the internal feature constant after it has been used. Change the display name instead.
- Keep dialog names readable. "Across flats" means something to a designer. "s" does not.
- Test in a clean Part Studio. A feature that works in a cluttered test file may depend on something you forgot was there. A blank Part Studio shows what a new user will experience.
- Commit small changes often. One change, commit, test. When something breaks, you know which change caused it.
Next
You now have a working custom feature with a standard-size dropdown. For more depth, including debugging, queries for selecting geometry, and a second complete feature, continue with the longer Onshape FeatureScript tutorial. If you are new to Onshape itself, start with the Onshape tutorial for beginners, and see the Onshape hub for every Onshape lesson on the site.
The text and code on this page are written by the cadjunkie team for current Onshape. To learn more about the site, see the About page or return to the homepage.