
Rhino Basics, week 04: understand NURBS and build with them
Why this week matters
Rhino is a NURBS modeler. Every curve and surface you have drawn so far, even the boxes and spheres, is made of NURBS underneath. Up to now you could ignore that and still get good results. From here on you cannot. Every surfacing habit that makes models clean, from choosing a command to fixing a bad reflection, depends on three ideas: degree, spans, and curvature.
This week explains those ideas in plain language, gives you the everyday surfacing toolkit, and ends with a small coffee carafe that uses all of it. It is the longest week in the series. Take your time.
Start with a quick review
Before the new material, make sure these five commands from earlier weeks are comfortable, because you will use them constantly with NURBS surfaces:
- Trim cuts a surface with a curve or another surface.
- FilletSrf builds a rounded surface between two surfaces.
- BlendSrf builds a smooth bridge surface between two surface edges, with control over how the bridge meets each side.
- OffsetSrf makes a parallel copy of a surface at a set distance, which is how you give a skin a thickness.
- Project drops a curve straight onto a surface along the view direction, so you can trim the surface with it.
If any of these are new, try each one on two simple surfaces before going on.
A working definition of NURBS
Control points
A NURBS curve is shaped by control points. The curve does not usually pass through them. Instead, each point pulls the curve toward itself, like a magnet on a flexible strip. Draw a curve with the Curve command, turn on its points with F10, and drag one. Only part of the curve moves, and it moves smoothly.
Degree
Degree describes how many control points influence each piece of the curve, and so how smooth and how flexible it is. The Curve command has a Degree option.
- Degree 1 is a polyline. Straight segments, sharp corners.
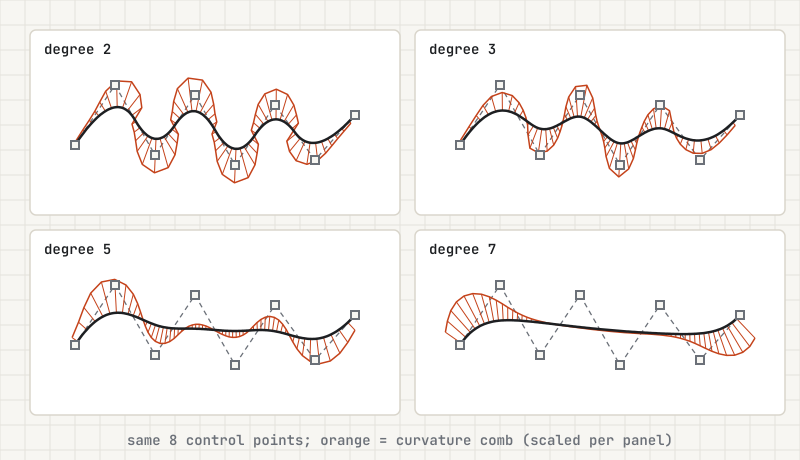
- Degree 2 gives smooth curves and can describe arcs and circles exactly, but the curvature changes in steps.
- Degree 3 is the everyday default. Curvature changes smoothly, which is what makes a surface look continuous in reflections.
- Degree 5 and 7 spread each point's influence over a longer stretch. Curves feel more fluid and are harder to kink, which is why some designers use them for long, sweeping surfaces. The trade-off is that each point is less local, so small adjustments affect more of the shape.
Draw four curves through roughly the same control points at degrees 2, 3, 5, and 7 and compare them. The higher degrees look calmer and sit further from the points.
Knots and spans
A curve with many control points is made of several pieces, called spans, stitched together at knots. You rarely edit knots directly, but you should know they exist: more spans means more control and more chances for small wobbles. The aim is always the fewest points that will describe the shape.
Reading a curvature graph
Run CurvatureGraph on a curve. Rhino draws a comb of lines along it; the longer the line, the tighter the curve bends at that spot. A smooth, flowing graph means a smooth curve. A sudden jump or a spike means a kink that will show up as a crease in any surface built from it. Get in the habit of checking the graph before you surface anything.
Surfaces have U and V
A NURBS surface is a curve swept in a second direction. Its control points form a grid with two directions, U and V, and each direction has its own degree and span count. Turn on the points of any surface and you can see both sets of rows.
Rebuild
Rebuild replaces a curve or surface with a new one that has a point count and degree you choose. On a surface, it lets you set U and V separately. Rebuilding helps when a surface has far too many points, uneven spacing, or a messy structure inherited from a messy curve. It hurts when the surface was trimmed or carefully fitted to its neighbors, because rebuilding changes the shape slightly and can open gaps at edges that matched before. Rebuild curves before you surface whenever you can, and rebuild surfaces only when you are willing to check and repair what touches them.
The everyday surfacing kit
Each of these commands builds a surface from curves. Choosing the right one is most of the skill.
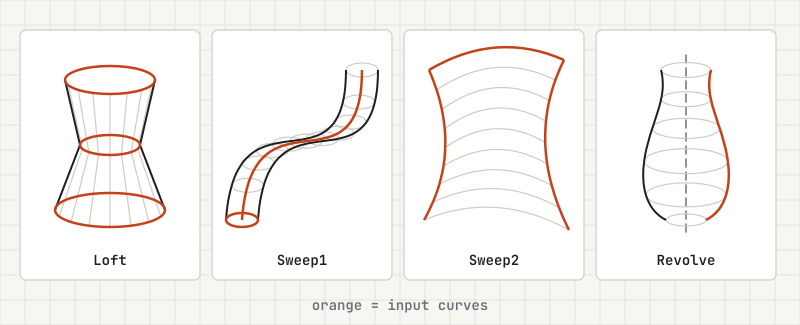
- Loft passes a surface through a series of cross-section curves, like a ship's hull built from its ribs. Use it when you know the shape at several stations.
- Sweep1 drives one or more cross-sections along a single rail curve. Use it for shapes like a handle or a moulding that follow one path.
- Sweep2 drives cross-sections along two rails, so the width can vary along the length. You used it for the side band in the iPhone project.
- Revolve spins a profile around an axis. Use it for anything turned on a lathe: bottles, knobs, lampshades.
- SetPt moves selected control points so they all line up in X, Y, or Z. It is the fastest way to flatten the end of a surface or align an edge exactly.
- Patch fits a surface to a set of curves or points that do not form a neat boundary. It is useful for filling holes, but it gives you less control than the others, so use it last, not first.
Primary and secondary surfaces
This is the most important vocabulary in the series. A primary surface defines the main form of an object. A secondary surface sits between or on top of the primaries: a fillet, a blend, a transition, a detail. Primary surfaces are built first and built carefully. Secondary surfaces are built to fit the primaries and must never force you to change them.
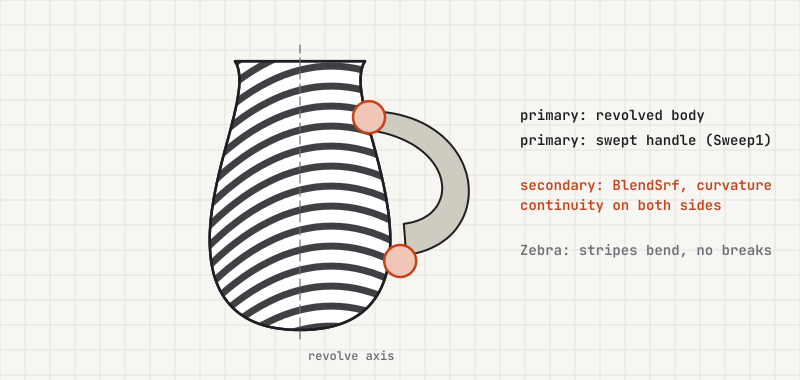
On the carafe you are about to model, the body is primary. The handle is primary too, in its own right. The smooth transition where the handle meets the body is secondary. If you get the primaries right, the secondaries are usually easy. If you start with the secondaries, you end up fighting every surface.
Exercise: a small coffee carafe
- In the Front view, draw half of the carafe profile as a single degree-3 curve: a flat base, a rounded belly, a narrower neck, and a slight flare at the lip. Keep the points few and evenly spaced. Check it with CurvatureGraph.
- Run Revolve on the profile around a vertical axis at its left edge. You now have the primary body surface.
- Draw a handle path in the Front view as a single curve that starts and ends just outside the body. Draw a small oval cross-section at one end of the path.
- Run Sweep1 to build the handle along the path. This is a second primary surface.
- Trim the handle ends back slightly so there is a gap between the handle and the body.
- Run BlendSrf between the trimmed handle ends and the body to make the secondary transition surfaces. Set continuity to curvature on both sides.
- Check the whole object with Zebra. Stripes should flow from the body through the blend into the handle without breaking.
For a spout, try pulling a few control points on the lip outward with SetPt and the drag tools, then check the curvature again.
Homework
Make a simple trimmed surface, such as a flat rectangle with a circular hole trimmed through it. Run Twist or Bend on it with a strong setting. Look at the result closely. You may see the hole distort, edges that no longer match, or a surface that looks faceted. Now Rebuild the surface and try again.
Write down, in two or three sentences, what broke and why you think it broke. The answer has to do with the full underlying surface that a trim hides, which you met in week 03. Understanding this will save you hours later.
For a deeper pass on everything in this week, work through the standalone Rhino NURBS surfacing tutorial, and for the same ideas explained across several CAD programs, see CAD surfacing techniques.
What's next
Week 05 changes pace. It leaves the command drills behind and introduces a maker project, along with a short note on showing your work with rendering. Continue to week 05, or browse other lessons on the Rhino hub.